Introduction
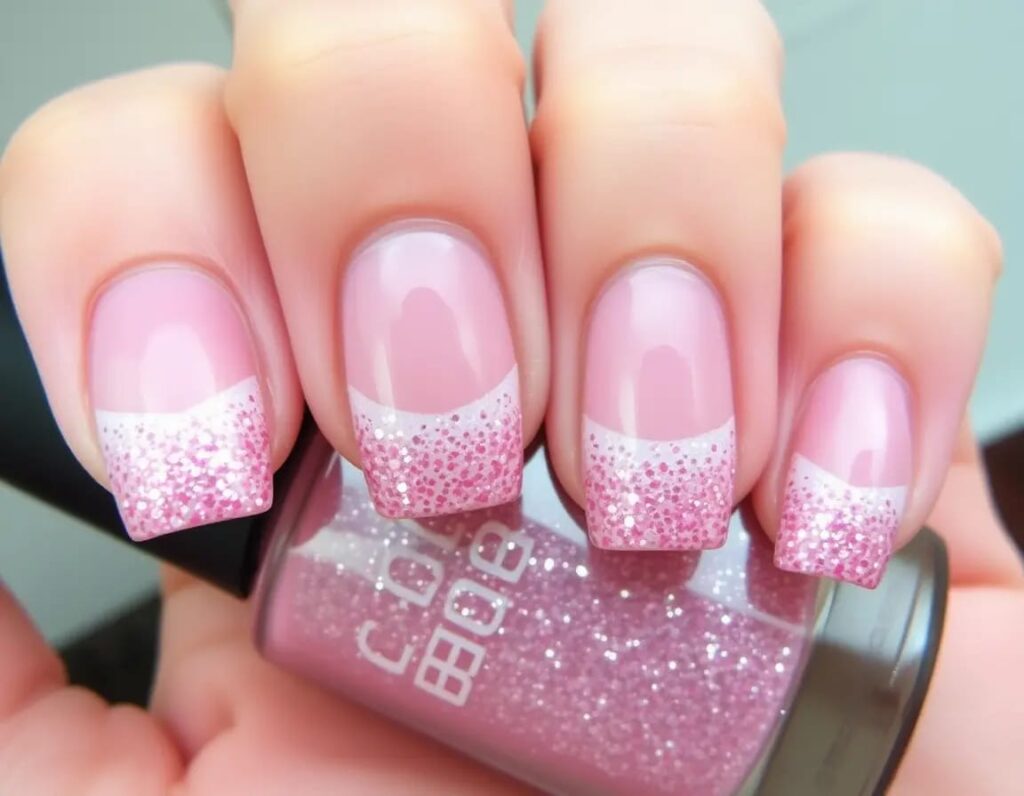
The French manicure has evolved from its classic white-tipped style to the more contemporary ombre design, where the tips fade into a soft gradient. This ombre effect brings a modern, subtle elegance to nails. The addition of glitter to this ombre French manicure has elevated the trend, offering a chic, sparkling twist. Combining refinement with a playful touch, this style has gained popularity for its versatility and fashion-forward appeal. It’s perfect for those who want a balance of sophistication and boldness, making it ideal for any occasion from casual to special events.
The Basics of French Ombre Nails
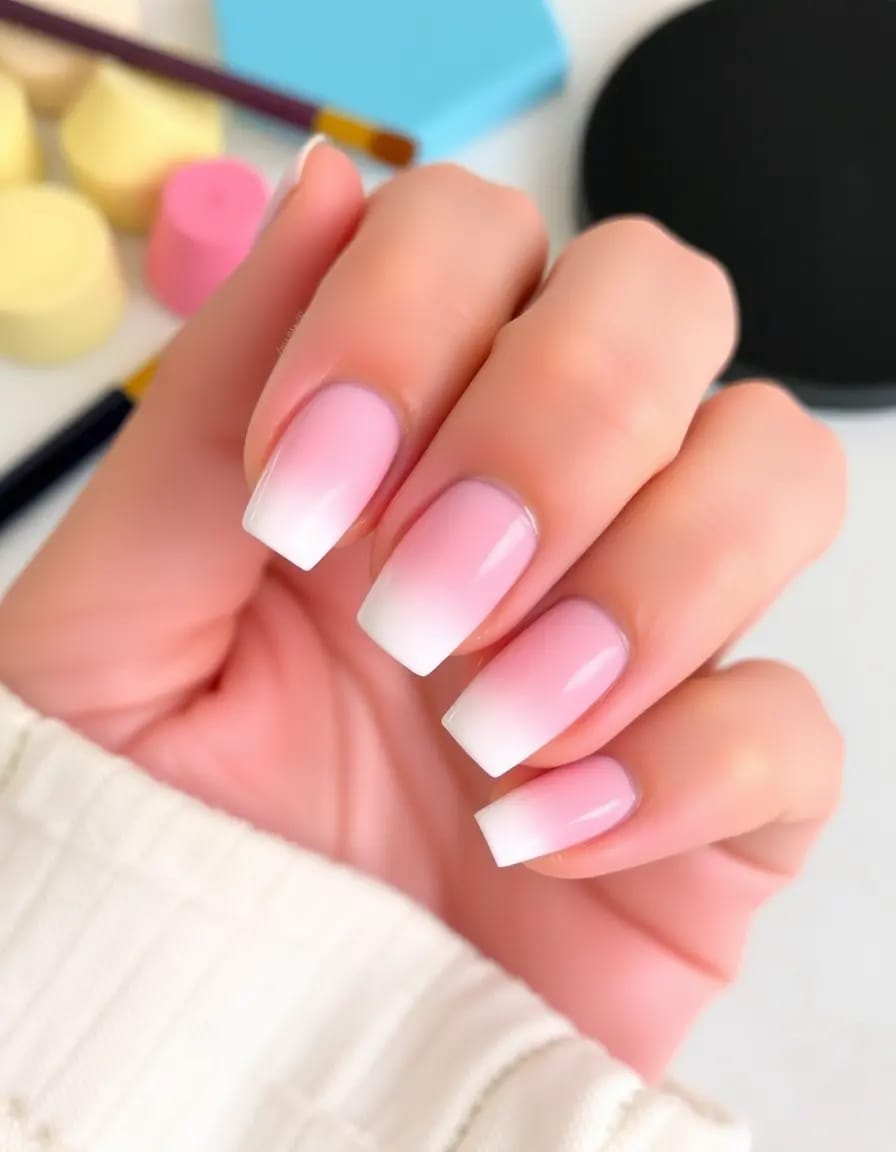
French ombre nails offer a modern and elegant twist on the timeless French manicure. Instead of the traditional harsh line that defines the white tips, French ombre nails feature a smooth gradient where the tip color gradually fades into the natural nail, creating a seamless, blended look. This design allows for more versatility and a modern approach to the timeless French style, making it popular for weddings, proms, or everyday wear. By introducing different shades, textures, and glitters, French ombre nails have become a favourite among nail enthusiasts looking for a soft yet edgy aesthetic.
What is French Ombre?
French ombre nails are created using a blending technique where the color at the tip of the nails gradually fades into the natural or base color at the cuticle, creating a soft gradient. Unlike the traditional French manicure, which relies on a stark contrast between the white tip and the rest of the nail, the ombre effect offers a more subtle, artistic design.
The gradient effect typically starts with a neutral base color, such as pink, beige, or clear, and transitions into a lighter or darker color at the tip. The transition between colors is seamless, making the nails look like a natural fade from one tone to another. This ombre effect can be done using various colors and can be customized with the addition of glitter, metallics, or even intricate nail art for a more personalized touch.
The beauty of French ombre nails lies in their flexibility and elegance. While classic French nails have always symbolized sophistication and simplicity, the ombre gradient offers an updated, fresh take on this beloved style. Adding a touch of glitter or using multiple shades allows for creative expression, making French ombre nails perfect for a range of occasions, from formal events to casual outings.
How French Ombre Nails Are Different from Classic French Manicures
The primary difference between French ombre nails and the classic French manicure is the way the tips are designed. In a traditional French manicure, the nails are painted with a natural pink or nude base and feature bright white tips, creating a high-contrast, clean look. This classic style is timeless, often seen in bridal looks or professional environments, as it conveys an image of neatness and sophistication.
On the other hand, French ombre nails incorporate a subtle gradient effect, where the color at the tip gradually transitions into the base color of the nail. This design removes the harsh contrast of the white tips and instead creates a softer, more blended appearance. The ombre effect mimics the natural gradient of a nail, making it appear more organic and fluid.
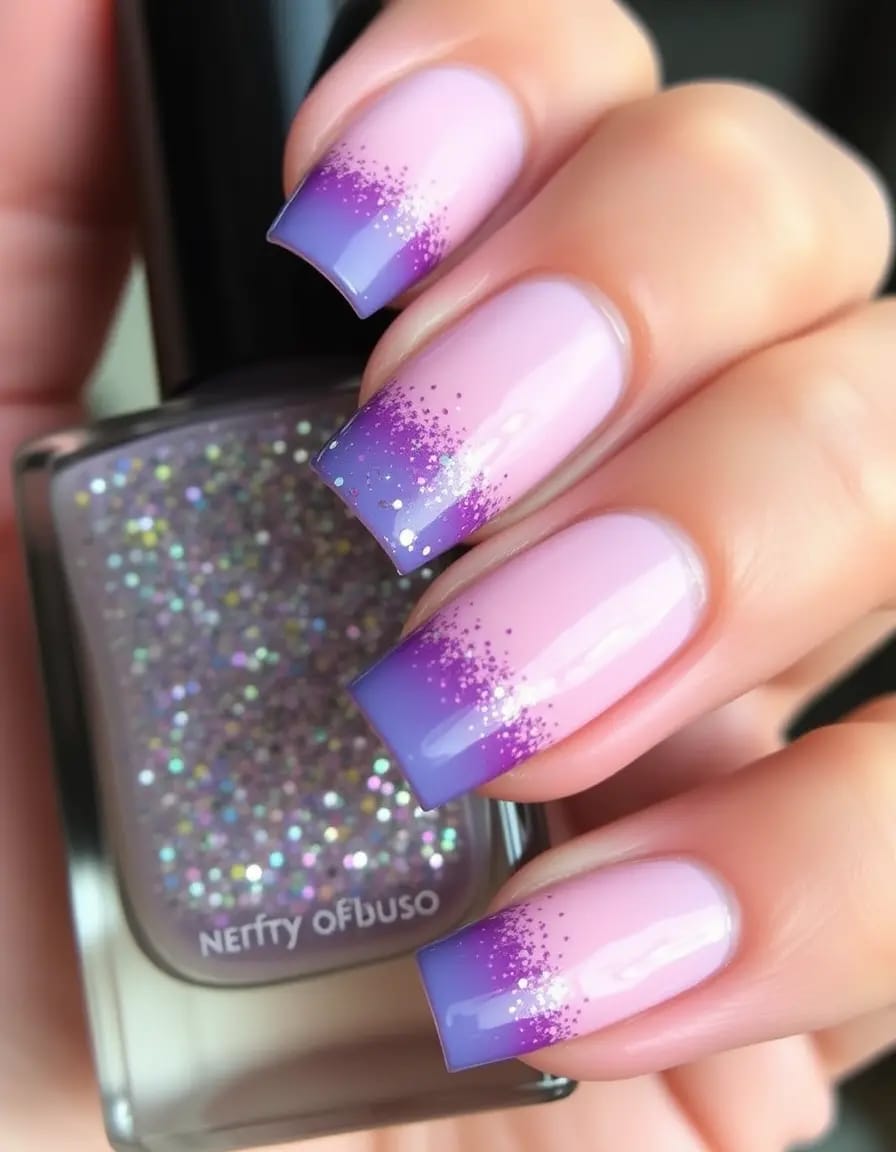
Additionally, French ombre nails are more versatile than the classic French design. While traditional French manicures typically stick to shades of pink and white, the ombre style allows for experimentation with various colors, such as nude, beige, pastels, or even bolder hues like purple or blue. The tips can also be adorned with glitter, adding extra sparkle and dimension to the nails. This flexibility makes French ombre nails a more modern and creative option for those who want something unique while still keeping the elegance of the traditional French look.
Tools and Products Needed for French Ombre Nails
Creating French ombre nails requires a specific set of tools and products to achieve a flawless gradient effect. Whether you’re doing them at home or visiting a nail salon, understanding the tools and products involved will help you achieve the best results.
Base Coat
The base coat is essential to protect your natural nails and ensure the longevity of your manicure. It provides a smooth base for the additional polish layers, prevents staining, and enhances the longevity of the manicure. For French ombre nails, a clear base coat or a light nude shade works best to give a neutral foundation for the ombre effect.Ombre Sponge
One of the most important tools for creating French ombre nails is the ombre sponge. These small, sponge-like tools are used to blend the colors together, creating the seamless gradient effect. They are typically available in small sizes, making them easy to use on nails. You can use an ombre sponge by dipping it into your chosen colors and gently pressing it onto the nail, blending the colors together for a smooth transition.Alternatively, some people use a makeup sponge or a cosmetic sponge wedge to create the ombre effect, but ombre-specific sponges are designed to produce more precise, uniform gradients.
Nail Polishes
The key to a successful French ombre design is selecting the right colors for your base and tip. Traditionally, French ombre nails use soft, neutral colors for the base, like pink, nude, or white, and a slightly darker or more vibrant shade for the tips. However, you can experiment with different shades depending on your personal style or the occasion.If you are incorporating glitter into your ombre design, choose glitter polishes that match or complement the gradient. Fine glitter is generally preferred for French ombre nails, as it creates a more subtle and elegant look. Chunky glitter may overwhelm the soft gradient effect but can be used sparingly at the tips for a bolder statement.
Glitter
Glitter is often the defining feature of French ombre nails, adding sparkle and texture to the overall design. Glitter can be added either to the tips or blended into the gradient itself for a subtle shimmer. Choose between fine glitter for a soft, elegant look or larger glitter particles for a more dramatic effect. Glitter in gold, silver, holographic, or iridescent tones works particularly well with French ombre nails, enhancing the gradient’s aesthetic while adding dimension.Some nail technicians may also use loose glitter or glitter powder to apply to the nails, creating a more textured and multi-dimensional look.
Top Coat
A high-quality top coat is necessary to seal the ombre effect and protect the design from chipping. A glossy top coat enhances the shine and smoothness of the nails, giving them a polished, finished look. For longer-lasting results, you can opt for a gel top coat, which provides extra durability and longevity. Be sure to apply the top coat carefully to avoid disturbing the delicate ombre effect or the placement of the glitter.Nail Art Tools (Optional)
For those looking to add more intricate designs, nail art tools like dotting tools, brushes, or striping tape can be used to create additional details, such as lines, dots, or decorative patterns. These tools can also help in defining the ombre gradient or adding decorative touches, like small rhinestones or metallic foils, to further elevate the design.Nail File and Buffer
Before starting your French ombre manicure, it’s important to file and buff your nails to ensure a smooth surface. A nail file helps shape your nails into the desired shape (square, oval, almond, etc.), while a buffer smooths out any ridges or imperfections on the nail’s surface, allowing the ombre and glitter to apply more evenly.Cuticle Oil (Optional)
To keep your nails healthy and hydrated after the manicure, you can apply cuticle oil. This helps to nourish the cuticles and prevent them from becoming dry or damaged, keeping your nails looking their best for longer.
Incorporating Glitter into French Ombre Nails
Glitter is the perfect way to elevate the already stunning look of French ombre nails, adding an extra dimension of sparkle and luxury. French ombre nails, known for their seamless gradient, offer a sophisticated and modern twist on the traditional French manicure. When combined with glitter, these nails transform into a bold, eye-catching statement while maintaining the elegance and refinement that French nails are known for. In this section, we will explore why glitter works so well with French ombre nails, how to incorporate various types of glitter, and the best techniques for ensuring the glitter complements the ombre effect.
Why Glitter Works with French Ombre
Glitter works exceptionally well with French ombre nails because it enhances the soft gradient effect and adds a playful yet glamorous element. The transition from the base color to the tip can be quite subtle, and adding glitter introduces visual interest without disrupting the natural flow of the ombre.
The ombre gradient itself is already a modern update to the traditional French manicure, providing a fresh and trendy look. Glitter helps amplify this trend by adding sparkle, making the nails stand out and capturing light in a beautiful way. It also enhances the smoothness of the ombre transition, giving it a more polished and dynamic appearance. By blending the glitter into the ombre effect, you achieve a design that feels both fashionable and refined.
Additionally, glitter offers endless customization options. From a light dusting of shimmer to a more dramatic glitter fade at the tips, there are countless ways to incorporate glitter into your French ombre nails. It allows for versatility, making this style suitable for both everyday wear and special occasions like weddings, parties, or holidays. Glitter can also match various color schemes, giving you the freedom to experiment with different hues and textures.
Types of Glitter
When incorporating glitter into French ombre nails, choosing the right type of glitter is essential for achieving the desired effect. The texture and size of the glitter particles can significantly impact the final look, so it’s important to understand the different types of glitter and how they affect the overall design. Below are the most common types of glitter used in French ombre nails:
Fine Glitter
Fine glitter is one of the most popular choices for French ombre nails because it provides a delicate, subtle sparkle. The tiny particles blend seamlessly into the ombre gradient, adding just the right amount of shimmer without overwhelming the soft transition between colors. Fine glitter works especially well when you want a more refined, elegant look or when you’re aiming for a more sophisticated take on the ombre style. It can be applied throughout the gradient or concentrated on the tips for a more focused effect.Chunky Glitter
Chunky glitter features larger particles that deliver a bold and attention-grabbing sparkle. When used in French ombre nails, chunky glitter is typically applied to the tips or scattered along the gradient to add a bold and statement-making touch. This type of glitter is perfect for those who want their nails to stand out and make a statement. While it can be fun and glamorous, it’s important to apply it carefully, as it can disrupt the gradient if not used properly. Chunky glitter is often paired with a gel or clear topcoat to help it adhere better and stay in place.Holographic Glitter
Holographic glitter has a unique, multi-dimensional quality that reflects light in different colors, giving it a futuristic and edgy appeal. Holographic glitter works beautifully with French ombre nails, as it enhances the gradient by creating a stunning visual effect that changes with the light. It can be used in both fine and chunky forms, and it adds a touch of magic to the nails. This type of glitter is perfect for evening events or for those who want a more eye-catching, playful twist on the traditional ombre look.Shimmer Glitter
Shimmer glitter is a more subtle form of glitter, providing a soft, pearlescent glow rather than the bold sparkle of fine or chunky glitter. It’s often used in French ombre nails to give the tips a gentle glisten without overwhelming the gradient. Shimmer glitter is perfect for a more understated, elegant look and works especially well in soft color palettes, like nude, blush, or pastel shades. It’s also ideal for those who prefer a more delicate finish but still want to incorporate glitter into their design.
Each type of glitter can dramatically change the mood of your French ombre nails, depending on how you apply it and the overall aesthetic you’re aiming for. Choosing the right type of glitter will depend on your personal style, the occasion, and how subtle or bold you want the final look to be.
Techniques for Adding Glitter
The key to incorporating glitter into French ombre nails is applying it in a way that complements the soft gradient effect. Too much glitter can overwhelm the ombre transition, while too little may not add enough sparkle. Below are some techniques for adding glitter to French ombre nails, along with tips for maintaining a balanced and chic design.
Using an Ombre Sponge
One of the most common techniques for creating a French ombre gradient is using an ombre sponge, and this method works perfectly for adding glitter. After applying the base coat and allowing it to dry, apply a small amount of glitter polish to the sponge, along with the ombre colors. Press the sponge gently onto the tips of the nails and then gradually blend it down toward the cuticle area. By blending the glitter with the ombre shades, you create a smooth transition that maintains the gradient effect while introducing a subtle sparkle.Concentrating Glitter at the Tips
For a more traditional French ombre look, you can apply glitter only to the tips of the nails. This is ideal for those who want a clean ombre effect with a touch of glamour at the tips. Use fine glitter for a more subtle look, or chunky glitter for a bold, eye-catching design. Apply the glitter carefully, ensuring it stays at the tips and does not disrupt the gradient effect on the rest of the nail.Layering Glitter Over the Ombre Gradient
For those who want to add a bit more sparkle, layering glitter over the entire ombre gradient is a great option. This technique can be used with shimmer or fine glitter to enhance the overall look while maintaining the smooth transition between colors. To achieve this, gently dust the glitter over the gradient once it has dried, using a makeup brush or a fan brush to ensure the glitter is evenly distributed. This method creates a soft, sparkling effect that blends beautifully with the ombre.Creating a Glitter Fade
A glitter fade involves applying glitter in a way that follows the natural gradient of the ombre design. The glitter should start at the tips and gradually fade as it moves toward the cuticle, mimicking the gradient effect of the ombre. This technique works particularly well with holographic or shimmer glitter, as the reflective particles enhance the fade, creating a more dynamic and eye-catching design. To achieve a perfect glitter fade, apply the glitter in layers, starting at the tip and gradually working down the nail.
Tips for a Subtle or Bold Glitter Gradient
Achieving the right balance of glitter is essential for ensuring the ombre effect remains the focus of the design. Here are some tips for creating either a subtle or bold glitter gradient:
For a Subtle Glitter Gradient:
- Use fine glitter for a soft, elegant look that won’t overpower the ombre effect.
- Apply glitter only to the tips or along the edges of the gradient for a light, understated sparkle.
- Stick to neutral-colored glitters, such as silver, gold, or champagne, to keep the design delicate and refined.
- Use a sheer glitter polish or a shimmer top coat to add a gentle glow without overwhelming the nails.
For a Bold Glitter Gradient:
- Opt for chunky or holographic glitter for a more dramatic, attention-grabbing effect.
- Apply more glitter to the tips of the nails, concentrating it for a statement look.
- Layer glitter over the ombre base for a more intense, sparkling finish.
- Choose contrasting colors or colorful glitter to add vibrancy and energy to the ombre nails.
Step-by-Step Guide to Creating French Ombre Nails with Glitter
Creating French ombre nails with glitter is a fun and glamorous way to elevate your manicure. Whether you’re aiming for a subtle, elegant look or a bold, attention-grabbing design, French ombre nails with glitter are versatile and stunning. This step-by-step guide will walk you through the process of preparing your nails, creating the ombre effect, applying glitter, and finishing with a top coat to ensure your manicure lasts. Follow these instructions carefully to achieve a salon-worthy French ombre look right at home.
Preparation: Nail Care, Cleaning, Filing, and Priming the Nails
Before you begin creating your French ombre nails with glitter, it’s crucial to start with properly prepared nails. Proper nail preparation ensures a smooth application of the polish and helps your manicure last longer.
Remove Old Polish: If you have any old nail polish on your nails, start by removing it with a nail polish remover. Opt for an acetone-based remover for stubborn polish, but avoid using it if your nails are already dry or damaged.
Soak and Cleanse: Soak your nails in warm water for a few minutes to soften them, which makes cleaning easier. After soaking, use a gentle nail brush to scrub away any dirt or oil from the nail surface. Clean nails help the polish adhere better and prevent bubbling.
Trim and File: If necessary, trim your nails to your desired length. For a classic French ombre look, nails are often kept a little longer, but you can choose any length that suits you. Use a nail file to shape the edges of your nails, giving them a uniform, rounded shape. Filing your nails ensures they are even and prevents snagging.
Push Back Cuticles: Use a cuticle pusher to gently push back your cuticles. Avoid cutting them to prevent infection or damage. Keeping your cuticles neat will allow for a clean application of the polish.
Buff the Nails: Buff your nails lightly to create a smooth surface. This will help the base coat adhere better, ensuring a flawless finish.
Prime the Nails: Apply a nail primer or base coat to your nails. This creates a smooth, adhesive surface for the polish and prevents staining. Allow the base coat to dry fully before proceeding to the next step.
Creating the Ombre Effect
The ombre effect is the key feature of this nail design, giving the tips of the nails a smooth, fading gradient that transitions into the natural nail color. You can achieve the ombre look using a sponge or a brush technique, depending on your preferred method.
Method 1: Using a Sponge (Most Popular)
Using a sponge to create the ombre effect is the most common technique, as it creates a smooth and seamless gradient.
Choose Your Colors: Select two nail polish colors for your ombre gradient. Typically, French ombre nails use a nude or soft pink color for the base and a white or light cream color for the tips. However, you can experiment with different colors to match your personal style.
Apply Base Color: Apply a thin layer of your base color (nude or pink) to your entire nail and let it dry completely. This serves as the foundation for the ombre effect.
Prepare the Sponge: Cut a small piece of makeup sponge (preferably a wedge sponge) to fit the size of your nails. Dab a bit of the white or tip color on the sponge, ensuring it covers only half of the sponge. The other half should remain clear or hold a small amount of the base color, depending on the gradient effect you want.
Create the Ombre Gradient: Gently press the sponge onto the tips of your nails and roll it downwards toward the middle. The sponge will create a gradual fade of color. Reapply the white polish to the sponge as needed to ensure smooth coverage. The key is to build up the color gradually, pressing lightly each time. You can repeat this step a few times to intensify the gradient.
Blend the Colors: After creating the gradient on each nail, use a clean makeup sponge or a small brush to smooth out any harsh lines between the two colors. This will help the gradient look more seamless.
Allow Drying Time: Let the ombre effect dry completely before proceeding to the next step.
Method 2: Using a Brush (More Precision)
If you prefer more control over the gradient and want a slightly different look, the brush method is a great option.
Apply Base Color: Start by painting your nails with your chosen base color (nude, light pink, etc.) and allow it to dry.
Use a Thin Nail Brush: Using a thin, angled nail brush, dip it into the white or tip color and gently apply it to the tips of the nails. Create a horizontal line near the tip, being sure to keep the edges as neat as possible.
Blend the Colors: To achieve the ombre effect, dip the same brush into the base color (nude or pink) and gently sweep it upwards towards the tip. Feather the brush gently to create a soft transition between the base color and tip. Repeat the process as needed until you reach the desired gradient effect.
Clean up the Edges: Use a clean-up brush dipped in nail polish remover to tidy up any excess polish around the cuticles or sides of your nails.
Allow Drying Time: Allow the ombre effect to dry fully before proceeding with the glitter application.
Applying Glitter
Once you’ve achieved the beautiful ombre gradient, it’s time to add the glitter for that extra sparkle and dimension. Depending on your style, you can choose to add glitter to the tips for a subtle touch or spread it across the entire gradient for a more bold effect.
Choose Your Glitter: Pick the type of glitter you want to use. For a subtle effect, fine glitter or shimmer glitter is ideal. For a more dramatic look, use chunky glitter or holographic glitter. Choose a glitter color that complements your ombre gradient.
Applying Glitter to the Tips (Subtle):
- Using a fine glitter polish or loose glitter, carefully apply it to the tips of your nails using a small brush or a nail art dotting tool.
- For loose glitter, gently press it onto the nail tips while the ombre gradient is still tacky, ensuring the glitter sticks evenly. Alternatively, you can dip your brush into a clear base coat, pick up the glitter, and apply it in small layers to the tips.
- The glitter should cover just the tips or fade gradually to create a subtle gradient from the white tip to the base color.
Applying Glitter Across the Gradient (Bold):
- If you want to create a more bold glitter effect, you can apply glitter across the entire gradient. Using a makeup sponge or a small brush, apply a light layer of fine or chunky glitter along the entire gradient of the ombre.
- For chunky glitter, it’s best to focus on applying it only at the tips and then lightly fade it down toward the base color for a more gradual transition.
- Ensure that the glitter is evenly distributed across the nail and doesn’t overpower the ombre effect.
Press Down the Glitter: Once you’ve applied the glitter, gently press it into the nail using a sponge or a flat brush to make sure it adheres well to the polish and creates a smooth finish.
Finishing Touches: Sealing the Design with Top Coat
After applying the glitter, you’ll want to seal your design to ensure it lasts and doesn’t chip. Here’s how to do it properly:
Apply Top Coat: Apply a thick, high-quality top coat over the entire nail to seal in the glitter and ombre effect. A gel-based top coat is ideal for this as it provides a glossy, long-lasting finish.
- Make sure to cover the edges of your nails to prevent the glitter from peeling off.
- Apply an even layer of top coat to avoid any streaking or uneven coverage.
Drying Time: Allow the top coat to dry completely before touching anything to ensure your manicure doesn’t smudge. It’s best to let the nails dry for at least 30 minutes, or even longer if you’re using a gel top coat that requires curing under a UV lamp.
Additional Tips:
- To prevent glitter from chipping or peeling, apply a fresh layer of top coat every few days. This will help lock the glitter in place and keep your nails looking fresh.
- If you’re using loose glitter, be careful not to apply too much, as it can cause the design to become bulky. A little glitter goes a long way.
- To prevent the glitter from getting stuck in your top coat brush, you can clean the brush with acetone before dipping it back into the bottle.
Variations of French Ombre Nails with Glitter
French ombre nails with glitter offer a beautiful canvas for creativity, allowing for numerous variations based on your style, preferences, or the occasion. Whether you’re going for a subtle shimmer or a bold glitter-filled design, there are many ways to personalize this timeless manicure. Below, we’ll explore various ways to incorporate glitter into your French ombre nails, from subtle glitter tips to full glitter ombre, colored glitter ombre, and even combining glitter with intricate nail art designs.
Subtle Glitter Tips: A Refined, Elegant Look
For those who prefer a more understated, classic look with a hint of sparkle, subtle glitter tips are an ideal choice. This variation retains the elegant nature of the traditional French ombre while incorporating just enough shimmer to add a modern twist.
How to Achieve Subtle Glitter Tips:
Start with the Ombre Base: Begin by creating the ombre gradient as you normally would, ensuring the transition from the base color to the tips is smooth and seamless.
Choose Your Glitter: For a refined look, opt for fine glitter or shimmer powder. These types of glitter are less chunky and provide a soft, delicate shine. Choose a glitter that complements your ombre color, such as a holographic shimmer for a more ethereal effect or a soft gold for a warmer touch.
Apply the Glitter: Using a small, flat brush or a makeup sponge, gently dab or press the glitter along the tips of the nails, blending it slightly into the gradient. Avoid covering the entire tip with glitter to maintain a subtle and elegant look. The glitter should be concentrated at the nail tips, fading out into the ombre gradient for a seamless, refined effect.
Top Coat: Once you are satisfied with the glitter application, seal the design with a high-quality top coat to ensure that the glitter remains in place and your nails have a glossy finish. The top coat will also help prevent any chipping and extend the longevity of your manicure.
Why It Works: This variation adds a touch of sparkle without overwhelming the delicate gradient effect. It’s perfect for brides, formal events, or those who want to add a little shimmer to their everyday look without going overboard.
Full Glitter Ombre Nails: Bold and Sparkling
For those who love glitter and want a more daring, statement-making French ombre look, full glitter ombre nails are the way to go. In this variation, glitter is incorporated into the entire ombre gradient, transitioning from the cuticle to the tip, creating an all-over sparkling effect.
How to Achieve Full Glitter Ombre Nails:
Apply the Base Color: Start by applying your base color to the entire nail and allow it to dry. A neutral pink or nude is often used, but you can experiment with different colors that suit your style.
Create the Ombre Effect: Use the sponge method or a brush technique to create the ombre gradient. Apply the lighter, glitter-infused color at the cuticle, gradually blending it down towards the nail tip. The transition from the base to the glitter should be smooth and seamless.
Add Glitter: Choose a glitter that matches your gradient or opt for a complementary shade. For full glitter ombre, you’ll need a chunkier glitter or fine glitter that can cover more surface area. Dab the glitter generously along the nail, starting at the cuticle and gradually working your way down to the tip. You can use a makeup sponge to lightly blend the glitter into the ombre gradient, ensuring it transitions smoothly across the nail.
Finish with a Top Coat: Once the glitter has been applied, allow the nails to dry thoroughly before sealing the design with a thick layer of top coat. This will lock in the glitter and ensure it lasts longer without chipping.
Why It Works: This design is perfect for those who want a bold, dazzling look. Full glitter ombre nails create a striking visual that is perfect for special occasions like New Year’s Eve parties, weddings, or any event where you want your nails to steal the show.
Colored Glitter Ombre: A Personalized and Playful Twist
If you’re looking to add a unique touch to your French ombre nails, colored glitter ombre is a fantastic option. This variation involves using colored glitter, either to complement or contrast with the base colors of the ombre gradient. Colored glitter adds a playful, personalized element to the classic French ombre style, making it ideal for creative expressions or themed events.
How to Achieve Colored Glitter Ombre Nails:
Start with Your Base Color: Apply a base color that complements the colored glitter you plan to use. For example, soft pastels like lavender, baby pink, or peach work well with similarly toned glitter, while bold shades like deep red or cobalt blue pair beautifully with contrasting glitter.
Create the Ombre Gradient: As usual, create the ombre effect using the sponge or brush method. The base color should be applied to the entire nail, with the transition from the cuticle to the tip fading gently.
Choose Colored Glitter: Select a colored glitter that works well with your ombre base. Fine glitter in shades of pink, blue, gold, or silver can create a soft, elegant look, while chunky glitter in contrasting colors can create a bold, fun design. Experiment with mixing multiple colored glitters for a more dynamic effect.
Apply the Glitter: Depending on the look you want, you can apply colored glitter only to the tips for a subtle effect or spread it across the entire ombre gradient for a more dramatic, full-on glitter finish. Use a brush or sponge to apply the glitter, ensuring it blends seamlessly with the ombre base.
Seal with Top Coat: Finish the look with a thick layer of top coat to seal in the glitter and give your nails a shiny, polished finish. This also helps prevent the colored glitter from fading or chipping.
Why It Works: Colored glitter ombre nails are perfect for those who want to express their creativity or celebrate a special event like a birthday, holiday, or festival. The use of colored glitter allows for customization based on your mood, outfit, or theme.
Glitter Ombre with Nail Art: Combining Glitter with Intricate Designs
For the ultimate in creativity and customization, glitter ombre with nail art is a stunning option that takes the French ombre look to the next level. This variation combines the elegance of the ombre gradient with other nail art designs such as florals, stripes, negative space, or geometric shapes. The combination of glitter and detailed nail art creates a truly unique and striking manicure.
How to Achieve Glitter Ombre with Nail Art:
Create the Ombre Base: Start by creating your ombre gradient, ensuring the transition between the base color and the tips is smooth. Allow the ombre gradient to dry completely before moving on to the next step.
Add Glitter: Apply glitter to the tips or across the entire ombre gradient, depending on your preference. Use fine glitter for a soft effect or chunky glitter for a bold, sparkly finish. Make sure the glitter is blended seamlessly into the ombre.
Incorporate Nail Art: Once the glitter is applied, you can start adding additional nail art. For example, you could:
- Floral Designs: Use a fine brush to paint delicate floral patterns or add small flower decals along the gradient or tips.
- Geometric Shapes: Incorporate gold or silver stripes, chevrons, or other geometric designs to contrast with the soft gradient.
- Negative Space: Use tape or a stencil to create negative space designs, leaving certain areas of the nails bare for a modern, edgy twist.
- Foil Accents: Add foil pieces to your nails for a high-fashion look that complements the glitter ombre design.
Seal the Design: After your nail art is complete, seal everything with a clear top coat to protect the design and ensure longevity.
Why It Works: Glitter ombre nails with nail art are perfect for those who love bold and intricate designs. Whether it’s for a special event or just for fun, this variation allows for endless customization and creativity, making your nails a true reflection of your personality and style.
Choosing the Right Colors for French Ombre Nails with Glitter
Selecting the right colors for French ombre nails with glitter is essential to achieving the perfect look. Whether you’re going for a subtle, classic style or a bold, dramatic statement, the right color combination can elevate your manicure to a new level. The beauty of French ombre nails lies in their versatility, offering endless possibilities to experiment with various shades and glitters. In this section, we’ll explore how to choose the right colors, from classic neutrals to bold and vibrant shades, as well as seasonal color inspirations for each time of the year.
Classic Neutrals: Timeless Elegance
For a refined and elegant French ombre look, classic neutral colors are always a winning choice. These colors create a soft, polished gradient that works well for both everyday wear and formal occasions like weddings or professional events. The addition of glitter to the ombre gradient enhances the look without overpowering the simplicity of the base color.
White, Pink, Nude, or Beige Base with Soft Silver or Gold Glitter
White Base: The traditional French manicure is often associated with crisp white tips, and this can be beautifully adapted to French ombre nails with a soft white base. White is a versatile and timeless choice that blends effortlessly with any type of glitter. For a more sophisticated look, opt for silver glitter, which adds a cool shimmer that complements the crispness of white. Gold glitter, on the other hand, offers a warmer glow, perfect for creating a classic and elegant style.
Pink Base: A soft pink base is another classic option for French ombre nails. It offers a natural, understated look that is both feminine and chic. Pink ombre nails work well with both silver and gold glitter, depending on the desired outcome. Silver glitter on pink creates a fresh, modern effect, while gold glitter provides a warm and luxurious finish.
Nude or Beige Base: A nude or beige base is perfect for those who prefer a more neutral, subtle look. These shades mimic the natural color of the nails, providing a sophisticated and understated canvas for the ombre gradient. Gold glitter, particularly in fine particles, can add just the right amount of sparkle without being too bold, making it ideal for a professional or more formal event. Silver glitter on a nude base offers a cooler, more modern twist.
Why Classic Neutrals Work: Neutral shades like white, pink, nude, and beige are universally flattering, making them suitable for all skin tones. They create a clean, polished look that works well for various occasions, from weddings to business meetings. Adding glitter enhances the design by providing a subtle, elegant sparkle that doesn’t overpower the gradient effect.
Bold and Vibrant Ombre Glitter: Make a Statement
If you’re looking to create a more daring and dramatic French ombre design, opting for bold and vibrant colors is the way to go. Bold ombre glitter nails are perfect for those who want to stand out and express their personality through their manicure. Vibrant shades like deep reds, blues, purples, or even neon hues create a striking contrast against the gradient and glitter, resulting in a show-stopping look.
Choosing Brighter Shades or Darker Tones for a Dramatic Effect
Bright Shades: Bright colors like fuchsia, electric blue, coral, or hot pink can create a fun and energetic ombre look. The transition between the bright color at the cuticle and the glittered tips adds a playful, bold twist to the classic French ombre style. Pairing these bright colors with holographic glitter or chunky glitter will give the design a festive, dynamic vibe.
Dark Shades: Darker tones like deep burgundy, navy blue, dark purple, or even black can create a sophisticated yet dramatic ombre effect. The gradient from a deep color to a glittered tip creates a stunning contrast, particularly when paired with fine or holographic glitter. Dark colors are also perfect for those who want to create an edgy look while still maintaining the elegance of a French ombre design.
Why Bold and Vibrant Ombre Glitter Works: Bold colors combined with glitter make a statement and allow for creativity and individuality. These ombre nails are ideal for those who want to stand out or for special occasions like parties, festivals, or evening events. The combination of glitter and bright or dark hues creates a striking and attention-grabbing design that adds excitement to any look.
Seasonal Color Inspiration: Reflecting the Season with Glitter Ombre Nails
One of the great things about French ombre nails with glitter is their versatility, allowing you to change the color palette to reflect the different seasons. Each season brings its own mood and color palette, which can be perfectly captured in your ombre nail design. Whether you want to embrace the light, pastel hues of spring or the rich, warm tones of fall, choosing seasonal colors can help your nails feel fresh and relevant.
Pastel Glitter Ombre for Spring: Spring is a time for renewal, and pastel colors are perfect for reflecting the light and airy mood of the season. Soft pastel shades like lavender, mint green, peach, and baby blue are ideal for creating a delicate and feminine ombre design. Adding pastel-colored glitter, such as a soft pink or iridescent shimmer, will enhance the ombre effect while keeping the look fresh and light.
- Pastel Pink with Silver or Opal Glitter: Soft pinks paired with silver or opal glitter create a dreamy, romantic design. The ombre effect transitions seamlessly from the pale pink to the glittered tips, adding just the right amount of sparkle for a spring-inspired look.
- Lavender with Holographic Glitter: Lavender is another popular pastel color for spring, and it pairs beautifully with holographic glitter. The gradient effect from lavender to holographic glitter creates a subtle yet magical sparkle, perfect for the season of blooming flowers.
Why It Works for Spring: Pastels are synonymous with spring and evoke a sense of calm and new beginnings. They’re light and playful, making them perfect for day-to-day wear or special occasions like Easter or spring weddings. The pastel glitter ombre adds a touch of elegance without being too flashy.
Metallic Tones for Winter: Winter calls for deeper, richer colors and bold metallic finishes. During this season, you can embrace colors like rich red, emerald green, sapphire blue, or even metallic shades like gold, silver, and bronze. These colors, combined with metallic glitter or shimmer, will give your nails a luxurious, festive feel.
- Emerald Green with Gold Glitter: Deep emerald green is a beautiful and sophisticated color that works wonderfully for winter ombre nails. When paired with gold glitter, the design exudes warmth and richness, perfect for holiday parties or New Year’s Eve celebrations.
- Midnight Blue with Silver Glitter: Midnight blue or deep navy, combined with silver glitter, creates a dramatic and chic winter ombre effect. The glitter catches the light, mimicking the twinkle of winter stars.
Why It Works for Winter: Winter nails are all about embracing deep, luxurious tones and metallics that reflect the season’s mood. These colors add depth and richness, making them ideal for holiday parties, festive gatherings, or any occasion where you want your nails to sparkle.
Fiery Shades for Fall: Fall is synonymous with warm, rich tones like burnt orange, deep red, maroon, and mustard yellow. These colors evoke the changing leaves and crisp air of the season. For fall, choose colors that reflect the richness of the season and pair them with gold, copper, or bronze glitter for a warm, glowing ombre effect.
- Burnt Orange with Copper Glitter: Burnt orange creates a bold, vibrant base, and when paired with copper glitter, it captures the essence of fall. The ombre effect fades from the warm orange to the shimmering copper, creating a striking yet elegant design.
- Deep Maroon with Gold Glitter: Maroon and gold are classic fall colors that evoke a sense of warmth and coziness. A deep maroon ombre fading into gold glitter gives your nails a festive, sophisticated look perfect for fall events or Thanksgiving.
Why It Works for Fall: Fall colors are all about warmth and richness, and they pair beautifully with glitter. The combination of deep, earthy hues and glowing glitter creates a warm and inviting look that is perfect for autumn-themed parties, harvest celebrations, or cozy nights out.
Trendy Styles and Inspirations for French Ombre Nails with Glitter
French ombre nails with glitter offer a versatile and fashionable way to elevate your manicure, whether you’re preparing for a special event, a wedding, or simply want to add some sparkle to your everyday look. The beauty of this style lies in its adaptability—there’s a French ombre glitter design to suit every occasion. From the elegance of bridal nails to the boldness of party looks, let’s explore some of the most trendy styles and inspirations for French ombre nails with glitter, including ways to pair them with outfits.
Bridal French Ombre Glitter Nails
Weddings are the perfect occasion for creating elegant and sophisticated French ombre glitter nails. Brides are increasingly opting for this style to add subtle yet glamorous sparkle to their wedding day look. Bridal French ombre glitter nails exude timeless elegance with a modern twist, making them an ideal choice for brides who want something refined but still eye-catching.
Elegant Ombre Glitter for Weddings: Soft Hues and Sophisticated Styles
For a bridal look, it’s essential to choose soft, neutral colors for the base of your French ombre nails. Classic shades like ivory, pale pink, or a soft nude are ideal for creating a delicate ombre effect. Adding glitter to the tips or in a subtle gradient enhances the look without overshadowing the overall bridal aesthetic.
Subtle Glitter Ombre: A soft pink or ivory base that gradually fades into a sheer white or silver glitter at the tips is a beautiful and timeless choice. The glitter should be finely milled and applied in a delicate way to preserve the soft elegance of the French ombre design. This subtle glitter ombre look is ideal for brides who want their nails to sparkle without being too dramatic.
Pearl or Opalescent Glitter: For an extra touch of bridal elegance, consider using opalescent or pearl-like glitter. These types of glitter have a soft, multi-dimensional effect that reflects light beautifully, making them perfect for a wedding. When paired with a pastel pink or white base, this creates a romantic and ethereal look.
Soft Gold or Silver Glitter: A touch of soft gold or silver glitter at the tips can provide a refined sparkle that complements the rest of your bridal accessories. The glitter can be applied sparingly at the tips or in a more spread-out gradient to create a soft, glowing finish.
Why It Works for Brides: Bridal French ombre glitter nails offer a combination of elegance and sparkle, making them perfect for weddings. The subtle use of glitter allows for a sophisticated look that will photograph beautifully while adding a contemporary twist to traditional bridal nails.
Party or Special Event Nails
French ombre nails with glitter are an excellent choice for special occasions, whether it’s a night out, a cocktail party, or a celebratory event. When you’re looking to make a bold statement, the right combination of colors and glitter can create a head-turning effect that complements your outfit and adds extra glam to your look.
Bold Glitter Ombre Nails for Nights Out
For a dramatic party or special event look, consider opting for bold and vibrant colors paired with chunky or holographic glitter. These types of glitters reflect light in different ways, creating an eye-catching, dazzling effect that is perfect for evening events.
Neon Ombre Glitter: For a more daring, on-trend look, neon colors like hot pink, electric blue, or lime green make a statement when paired with bright, chunky glitter. The ombre gradient from a neon color to a glittery tip adds an extra pop of excitement and energy, making it perfect for club nights or music festivals.
Metallic Glitter Ombre: Metallic colors, such as gold, silver, and bronze, are excellent choices for glitter ombre nails, especially for formal events. These bold metallic shades transition beautifully into shimmering glitter tips, creating a sophisticated yet eye-catching look. Gold glitter ombre nails are particularly popular for holiday parties, New Year’s Eve celebrations, or cocktail parties.
Black and Silver Glitter Ombre: A bold and edgy combination like black and silver glitter creates a striking contrast, making it ideal for evening events. The gradient from dark black to glittering silver tips is edgy and chic, perfect for a glam night out or a formal event.
Why It Works for Special Events: French ombre nails with glitter in bold colors and designs are perfect for special occasions. Whether you want to stand out with neon shades or shine in metallic hues, glitter ombre nails add the right amount of sparkle and personality to your party outfit.
Everyday Ombre with Glitter
While French ombre nails with glitter are often associated with special occasions, they can also be incorporated into your everyday look, offering a subtle touch of glam that’s office-friendly and stylish. The key to creating everyday glitter ombre nails is to keep the design simple, using neutral or soft colors with a delicate application of glitter.
Subtle Ways to Incorporate Glitter into Your Daily Look
For work or casual outings, a more understated glitter ombre look is ideal. Think soft gradients with fine glitter that adds just a hint of sparkle, making your nails elegant but not overpowering.
Soft Pink and Clear Glitter Ombre: A soft pink base fading into a clear, fine glitter at the tips is perfect for everyday wear. The glitter should be sparse and subtle, so it adds dimension and light without standing out too much. This look is simple enough for an office setting but still elegant for dinner or casual dates.
Nude Base with Subtle Gold Glitter: A nude base with gold glitter at the tips is a refined yet chic everyday look. Gold adds warmth and sophistication, while the nude color keeps things neutral and professional. This combination is versatile and can be worn with anything from business attire to casual weekend outfits.
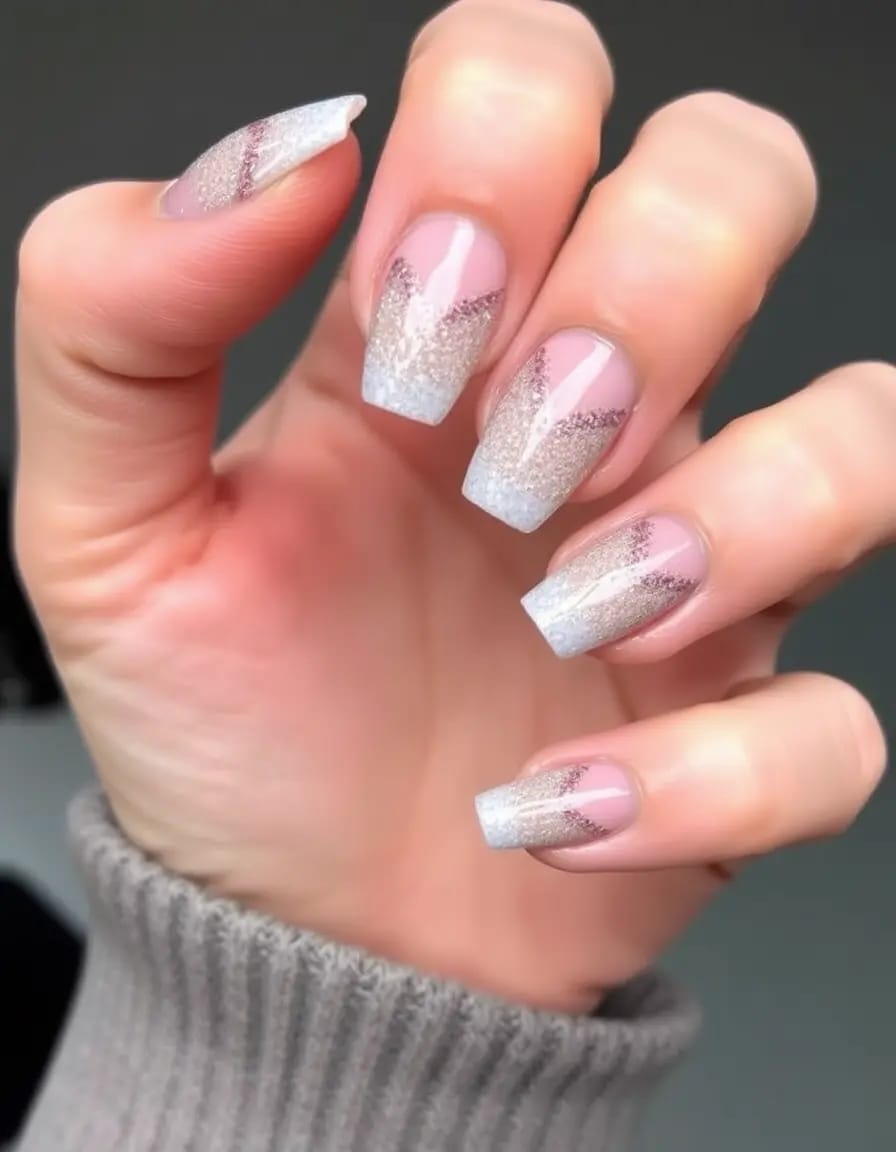
French Ombre with Pearl Glitter: If you want something more sophisticated yet minimalistic, opt for a clear or pearl base with a slight gradient of white and silver glitter at the tips. This is perfect for a polished and clean look that works well with almost any outfit.
Why It Works for Everyday: Subtle French ombre nails with glitter offer a balance between chic and casual. By using soft base colors and applying glitter in a minimalistic way, this style is sophisticated enough for the workplace but still fashionable for daily wear.
Matching Ombre Glitter Nails with Outfits
A well-coordinated manicure can enhance any outfit, and French ombre nails with glitter are no exception. Whether you’re dressing for a wedding, a night out, or a casual day at work, matching your nails with your outfit can complete your look and make a stylish statement.
Styling Your Nails to Complement Dresses, Casual Wear, or Special Event Attire
Matching with Formal Dresses: When attending a formal event or wedding, opt for French ombre nails with soft glitter in shades like white, silver, or pastel pink to complement an elegant gown. The subtle gradient will add a touch of sophistication without competing with the dress.
Pairing with Casual Wear: For casual or everyday wear, match your ombre glitter nails with neutral or pastel-colored outfits. Nude or beige nails with a hint of gold glitter go well with laid-back looks, such as jeans and a blouse or a sundress.
For Special Events: When dressing for special occasions like a party or night out, go bold with vibrant glitter ombre nails in neon, metallic, or jewel-toned colors. These designs pair perfectly with cocktail dresses, mini skirts, or sleek evening gowns.
Why It Works: Matching your nails to your outfit creates a harmonious look that enhances your overall style. Whether for casual or formal occasions, French ombre nails with glitter can be adapted to complement any attire, making them a versatile and fashionable choice.
French Ombre Nails with Glitter for Different Nail Shapes
French ombre nails with glitter are versatile and can be customized to suit a wide variety of nail shapes. The nail shape you choose plays a significant role in how the ombre effect and glitter will appear. Whether you prefer a classic, timeless shape or a bold, dramatic one, the combination of glitter and ombre can elevate your nails to a whole new level. Let’s explore how French ombre nails with glitter work with different nail shapes, from the soft and elegant oval to the edgy stiletto.
Classic Oval Nails
How the Ombre Effect Works on Oval Nails for a Timeless Look
Oval nails are one of the most popular and timeless shapes, providing a soft, natural look. The gently rounded shape of the nail enhances the ombre effect, creating a seamless, elegant gradient from the base to the tip. With the right color combination and glitter, oval nails can take on a classic French ombre design that looks both sophisticated and chic.
Smooth Gradient: The natural curve of oval nails lends itself to a smooth, fluid ombre effect. The transition from the base color to the glitter at the tips is subtle and soft, offering a clean, polished finish. For an elegant and understated look, a soft nude or pale pink base with a light dusting of silver or gold glitter at the tips will add a touch of sparkle without overwhelming the design.
Glitter Placement: On oval nails, the ombre glitter should be applied sparingly, with most of the glitter concentrated at the tips and gradually fading toward the base. This will preserve the natural elegance of the oval shape while still allowing the glitter to shine through. A fine, subtle glitter is best for oval nails, as it won’t overpower the smooth curve.
Timeless Design: Oval nails with a soft French ombre glitter design are perfect for all occasions, from weddings to everyday wear. They are versatile and can work well with both formal and casual outfits, giving a timeless look that never goes out of style.
Square and Squoval Nails
Best Glitter Ombre Styles for Square Nails and How to Create Symmetry
Square and squoval nails offer a more modern and edgy look compared to oval nails. With their sharp, defined corners, square nails provide a solid base for creating a more graphic ombre effect. Squoval nails, which have rounded corners but a square-like shape, are similar but slightly softer. Both shapes provide a great canvas for a bold French ombre glitter design, but creating symmetry and balance is key to making the most of these shapes.
Creating Symmetry: For square nails, it’s important to maintain balance when applying the ombre effect and glitter. The sharp corners naturally draw attention, so the ombre gradient should be applied carefully to avoid harsh lines. Begin with a neutral base color like beige, nude, or light pink, and transition into the glitter from the tip down the sides of the nail. This will create a subtle gradient that complements the strong lines of the square shape without looking too harsh.
Glitter Application: Glitter can be applied along the tips of square nails for a striking, symmetrical effect. Use a fine glitter for a softer ombre, or opt for chunky glitter for a bolder design. If you choose chunky glitter, be sure to apply it evenly across the tips, avoiding any uneven spots that could detract from the overall symmetry.
Squoval Variation: Squoval nails have the benefit of offering the sleekness of square nails with the softness of rounded edges. The ombre effect on squoval nails can be softer, with a smoother gradient that is less angular. Glitter should be applied with more delicacy to maintain the subtlety of the shape while still adding sparkle. Squoval nails are ideal for those who want a bold yet balanced design.
Why It Works: Square and squoval nails provide a clean, geometric aesthetic, making them ideal for bold glitter ombre designs. The sharp angles or soft curves of these shapes allow for more dramatic transitions and bold choices in glitter, whether you’re aiming for a more symmetrical or artistic look.
Almond and Coffin Nails
Popular Ombre Glitter Styles for Longer, Tapered Nails
Almond and coffin nails, both of which feature a tapered tip, are beloved for their elongated, elegant look. These shapes are perfect for creating striking French ombre glitter designs, as their length allows for a smooth gradient and ample space for glitter to transition beautifully. Both almond and coffin nails create a sophisticated and refined canvas for the ombre effect, making them ideal for those who want to add some dramatic flair to their manicure.
Almond Nails: Almond nails have a soft, rounded shape that tapers to a point at the tip, creating a sleek and elongated appearance. This shape works exceptionally well with French ombre glitter designs, as the long length allows the ombre gradient to transition smoothly across the nail. You can apply a fine glitter at the tip for a delicate, subtle sparkle or use a chunkier glitter for a more dramatic effect.
Coffin Nails: Coffin nails (also called ballerina nails) are long and tapered, with a square tip. The shape is bold and modern, and it pairs beautifully with French ombre glitter, especially if you’re aiming for a high-impact look. The ombre effect on coffin nails can be more pronounced due to the extra length, with a more pronounced gradient from base to tip. Glitter can be added sparingly along the tips or dispersed evenly across the gradient for a glamorous finish.
Glitter Application: For both almond and coffin nails, the glitter should start at the tips and gradually fade toward the center of the nail, creating a smooth and seamless gradient. If you’re using a chunky glitter, be mindful of the placement to avoid a lumpy finish. Fine glitter works best for these shapes, as it adds a sophisticated sparkle without detracting from the sleek, elongated silhouette.
Why It Works: Almond and coffin nails offer the perfect length and shape for showcasing French ombre glitter nails. The extended length allows for a more dramatic gradient, while the tapered shape draws attention to the ombre effect. Glitter adds an element of glamour to these elegant designs, making them perfect for formal occasions or when you want to make a statement.
Stiletto Nails
Bold and Dramatic Glitter Ombre on Stiletto-Shaped Nails
Stiletto nails are bold, edgy, and full of drama. With their pointed tips, they create a fierce and eye-catching look that is perfect for those who want to make a statement. When it comes to French ombre glitter nails, stiletto nails are the ideal shape for showcasing a bold and dramatic design. The extreme length and sharp point of stiletto nails allow the ombre gradient to stand out, and adding glitter enhances their boldness, creating an even more striking effect.
Creating a Bold Gradient: On stiletto nails, the ombre effect can be more pronounced, with a stark contrast between the base and the glitter at the tips. Since stiletto nails are long and tapered, you can experiment with a wide range of colors and glitter types. For example, starting with a deep burgundy or black base and transitioning into gold or holographic glitter can create a powerful, eye-catching effect.
Glitter Application: For stiletto nails, the glitter should be applied heavily at the tips to create a strong contrast between the dark base and the glittering tips. The glitter can be scattered along the edges for a jagged, edgy look or applied more evenly for a smoother transition. Using chunky glitter or holographic glitter on stiletto nails adds an extra layer of boldness and shine.
Bold, Colorful Ombre: Stiletto nails are a perfect canvas for experimenting with bold color combinations. Try using a deep purple or electric blue base that transitions into a bright silver or gold glitter. The elongated shape of stiletto nails allows for a striking gradient, making them the perfect nails for attention-grabbing ombre glitter designs.
Why It Works: Stiletto nails are designed to be bold and daring, so a glitter ombre effect on this shape naturally attracts attention. The length of the nails and sharpness of the tip allow for a more dramatic gradient and glitter placement, making stiletto nails the ultimate shape for a bold, show-stopping French ombre glitter design.
Nail Care and Maintenance for French Ombre Nails with Glitter
French ombre nails with glitter are a stunning and fashionable manicure choice, but they require proper care and maintenance to keep them looking fresh and beautiful for as long as possible. From ensuring the glitter stays intact to maintaining nail health, taking the right steps for nail care will prolong the life of your glitter ombre nails while keeping your nails healthy and strong. In this section, we’ll cover how to make glitter stay longer, prevent chipping, moisturize your nails and cuticles, and properly remove glitter without damaging your natural nails.

How to Make Glitter Stay Longer
Using Quality Topcoats and Reinforcing with Gel Layers
One of the most important steps in ensuring that your glitter ombre nails last is applying a high-quality topcoat. A topcoat serves as a protective barrier that seals the glitter in place and adds a glossy finish, preventing wear and tear. Here are the key ways to make your glitter stay longer:
Topcoat Selection: Choose a durable topcoat that is specifically designed for glitter nails. Some topcoats are formulated to smooth out the surface of the glitter, which can otherwise create a bumpy texture. Look for a topcoat that is designed to withstand daily activities and prevent premature chipping.
Gel Topcoat: For longer-lasting results, consider applying a gel topcoat. Gel topcoats not only enhance the shine but also provide a thick, durable layer that helps secure the glitter in place. If you’re looking for a long-lasting manicure, you may want to opt for a gel nail polish system that includes both color and topcoat. Gel nails are less likely to chip or peel, which is especially important with intricate designs like French ombre glitter.
Reinforcement Layers: For added durability, apply a second layer of topcoat after the first one has dried. This added layer helps seal the glitter and creates a stronger bond between the glitter and the nail surface. It also helps prevent the glitter from lifting off prematurely, especially at the tips where it can be more prone to wear.
Sealing the Edges: Don’t forget to seal the edges of your nails with the topcoat. Glitter can start to lift around the edges, especially if your nails come in contact with rough surfaces or moisture. Apply topcoat around the edges and tips of your nails to keep the glitter in place.
Why It Works: Using a quality topcoat, especially one designed for glitter, will ensure that your French ombre nails with glitter stay looking fresh for a longer period. Gel topcoats and reinforcement layers add strength and resilience to the design, preventing premature wear.
Preventing Glitter from Chipping
Regular Touch-ups and Using Protective Products
Glitter is beautiful but can be prone to chipping, especially on the tips of your nails where the most wear occurs. Regular touch-ups and using protective products can significantly extend the lifespan of your glitter ombre nails.
Regular Touch-ups: Over time, wear and tear from daily activities such as typing, cleaning, or other physical tasks can cause the glitter on your nails to chip or fade. To keep your nails looking fresh, it’s a good idea to perform touch-ups when necessary. If the glitter at the tips starts to chip, carefully apply a small amount of glitter polish along the edges and seal it with topcoat to restore the ombre effect.
Protective Gloves: Whenever you’re engaging in activities that involve water, chemicals, or rough surfaces—such as dishwashing, cleaning, or gardening—wear protective gloves. Moisture and harsh chemicals can cause the glitter to lift, while prolonged exposure to rough surfaces may result in chipping. Gloves provide a protective barrier that helps keep the glitter intact.
Use of Cuticle Oil: Cuticle oil not only nourishes your cuticles but also helps to maintain the elasticity of your nails. This prevents the nails from becoming too dry and brittle, reducing the risk of the glitter chipping or lifting prematurely. A few drops of cuticle oil applied daily will help keep your nails flexible and healthy.
Avoiding Stress on the Nails: Be mindful of excessive force on your nails, such as using them as tools or applying pressure to the tips. This can cause chipping or cracking in the glitter design. Instead, use the pads of your fingers for tasks that require pressure or force to prevent unnecessary strain on your nails.
Why It Works: Regular touch-ups, the use of protective gloves, and nourishing your nails with cuticle oil are all simple ways to prevent glitter from chipping. These actions protect the manicure from everyday wear while also keeping your nails strong and flexible.
Moisturizing Nails and Cuticles
Maintaining Nail Health Even After Repeated Application of Glitter Designs
While glitter ombre nails look stunning, it’s important to remember that repeated application of nail polish, especially with glitter, can cause your nails and cuticles to become dry and weak. Proper hydration is crucial for maintaining both the health of your nails and the longevity of your nail designs.
Moisturizing the Nails: The first step in maintaining healthy nails is moisturizing them regularly. After removing your nail polish or glitter, apply a nourishing nail cream or oil to hydrate the nail surface. Regular moisturizing helps keep nails from becoming brittle or prone to breakage. Look for a product with vitamins A, E, and C, which are known for promoting nail strength and growth.
Cuticle Oil: Cuticle oil is essential for keeping the skin around your nails hydrated. Dry cuticles can cause your manicure to lift prematurely, especially if the edges start to peel. Apply cuticle oil at least once a day, preferably before bed, so it has time to soak in overnight. This will help keep your cuticles healthy and prevent hangnails, which can detract from your overall manicure.
Avoid Harsh Chemicals: Repeated exposure to chemicals, including nail polish removers, can dry out both your nails and cuticles. Opt for acetone-free removers to reduce the drying effect and consider using moisturizing nail soaks to keep your nails hydrated. If you’re doing dishes or using cleaning products, it’s also a good idea to wear gloves to protect your nails from harsh chemicals.
Hydration for the Skin: In addition to moisturizing the nails and cuticles, don’t forget about the surrounding skin. Keep your hands and the skin around your nails hydrated to avoid cracking or dryness that can occur from frequent nail polish removal and application. A nourishing hand cream or lotion will keep the skin soft and supple.
Why It Works: Moisturizing your nails and cuticles is a simple yet effective way to maintain nail health and prevent brittleness. Healthy, hydrated nails provide a better base for your glitter ombre manicure, helping it last longer and reducing the likelihood of chips or cracks.
Removing Glitter Without Damage
Proper Removal Techniques to Avoid Damaging the Natural Nail Surface
Removing glitter from your nails can be tricky, especially since glitter particles tend to cling to the nail surface. Improper removal can lead to damage to your natural nails, leaving them weak or prone to peeling. Here are the best practices for removing glitter ombre nails without causing harm:
Soak and Remove in Stages: To remove glitter without causing damage, start by soaking your nails in acetone or a gel polish remover. Use a cotton ball soaked in acetone and place it on each nail, then wrap your nails in aluminum foil to allow the remover to break down the polish and glitter. Let the soak sit for 10–15 minutes.
Gently Scrape Off the Glitter: After the glitter has softened, use a wooden or metal cuticle pusher to gently scrape the glitter off the nails. Avoid using excessive force or scraping too hard, as this can cause the nail surface to become scratched or damaged. Be patient and allow the remover to work, so you don’t risk harming your nails.
Avoid Peeling Off the Glitter: Never peel off glitter or nail polish by force. Peeling can strip off layers of the nail and damage the natural nail surface. Instead, always use the soaking and scraping method for a safer removal process.
Nail Buffer: After the majority of the glitter has been removed, use a gentle nail buffer to smooth the surface of your nails and remove any remaining glitter particles. Be careful not to over-buff, as this can weaken the nail surface. Buffing helps ensure that your nails are smooth and ready for the next manicure.
Rehydrate: Once the glitter and polish have been removed, apply cuticle oil and hand cream to rehydrate your nails and cuticles. This will help restore moisture lost during the removal process.
Why It Works: Soaking, scraping, and gentle buffing ensure that your nails are not damaged during the glitter removal process. This method helps maintain the health and integrity of your natural nails while removing the glitter effectively.
Conclusion
French ombre nails with glitter have quickly risen in popularity, blending the timeless elegance of the classic French manicure with a modern, sparkling twist. This style offers a perfect balance of sophistication and glamour, making it ideal for anyone who loves a refined look with a touch of sparkle. The versatility of the design allows it to complement any occasion, from casual outings to special events. Whether you choose a subtle shimmer or a bold glitter gradient, this trend invites you to experiment and create unique, eye-catching nail art. Embrace the fun of personalized nail designs and let your creativity shine with trendy French ombre nails with glitter.
Thank You for Visiting!
If you enjoy what you read, please consider supporting us with a small donation. Your support helps us continue creating valuable content for you.